Explosive Leg Power Training with Leg Resistance Bands
Explosive Leg Power Training with Leg Resistance Bands
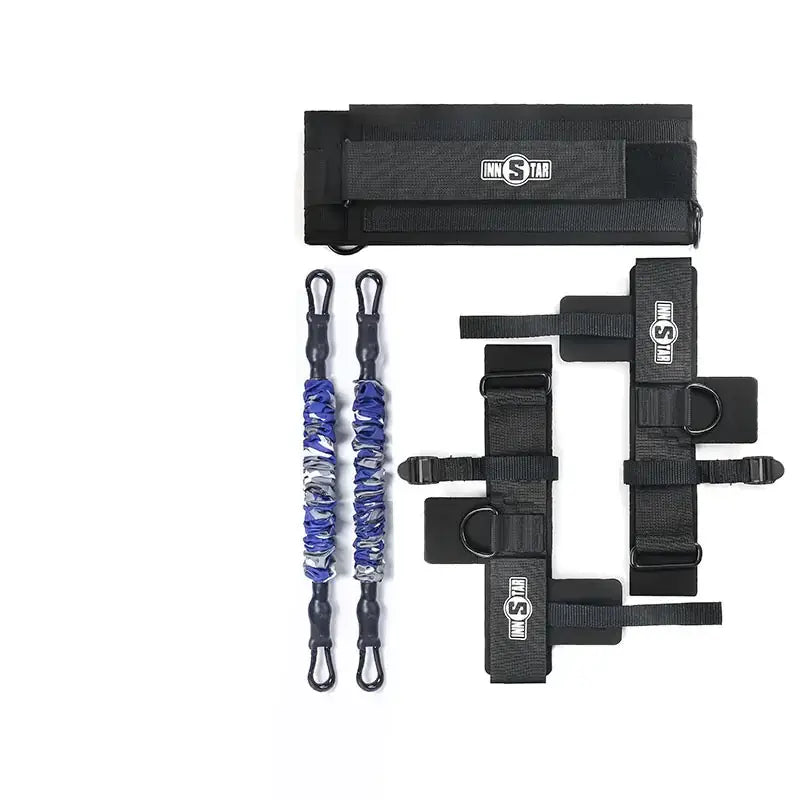
Powerful legs are the engine behind faster sprints, higher jumps, and better overall athletic performance. If you’re chasing quicker accelerations or a higher vertical, you need a training tool that can safely push your strength and speed through its full range of motion. The Green Knight Leg Power Explosion Trainer offers a compact, portable solution that uses resistance bands to develop leg power wherever you train. With four resistance levels — 100 lbs, 150 lbs, 200 lbs, and 300 lbs — this trainer lets you progress as you get stronger, making it suitable for beginners and seasoned athletes alike.
In this guide, you’ll learn how resistance bands specifically support leg development, how to use the trainer effectively, and practical workouts that combine strength and plyometrics for real-game improvements. We’ll also weave in accessibility tips like where to shop for resistance bands and how to choose models with the best grip and durability, so you can train confidently.
Before you start, consider this: the right resistance level matters. Too light, and you won’t elicit the needed gains; too heavy, and you risk form breakdown and injury. The four available resistance settings on this trainer make it easy to ramp up gradually as your power increases, ensuring steady progress over weeks and months.
Why resistance bands are a game-changer for leg power
Resistance bands target the main muscles involved in jumping, sprinting, and explosive movements: the glutes, quadriceps, hamstrings, and calves. Unlike free weights alone, bands provide continuous tension through every phase of a movement, including the eccentric (lowering) and concentric (lifting) portions. This constant tension helps improve hip drive, knee extension, and ankle stiffness — all critical for fast starts and powerful takeoffs.
Using bands also encourages better neuromuscular coordination. When you’re training with the Leg Power Explosion Trainer, you must stabilize your hips and core while your legs fire against resistance, which translates into more efficient force transfer during running and jumping.
Choosing the right resistance level for your goals
The trainer’s four resistance levels let you calibrate training intensity to your current strength and technique. If you’re new to jump training, start on the 100 lb setting to learn movement patterns with a safe range of motion. As you gain control and leg strength, move up to 150 lb or 200 lb for added force. The 300 lb setting is a progression for athletes who regularly perform high-intensity plyometrics and need substantial resistance to challenge speed-strength capacity.
Tip: resistance bands with handles can offer a secure grip and easier setup for many users. When shopping, you’ll often find options labeled with the weight they provide at a given length, so pick a product whose stated resistance aligns with your training level. If you’re unsure, start lighter and progress slowly to protect your technique.
For broader shopping options, resistance bands are widely available at retailers including Walmart and other sporting goods stores. Online choices, user reviews, and material quality can help you compare options beyond price alone. Look for durable tubing (like premium TPE) and reinforced connections to ensure longevity through frequent jumping and pulling movements.
How to use the Green Knight trainer for your first sessions
Begin with a quick warm-up focused on activating the hips, ankles, and knees. Light leg swings, bodyweight squats, and ankle mobility drills prepare your joints for resistance work. Attach the trainer, choose a comfortable resistance level, and perform controlled repetitions that emphasize form over speed.
Key technique cues: keep your chest up, hips level, and knees tracking over your toes. Engage your glutes before every jump, and land softly to protect joints. Move from box jumps and resisted squats into more dynamic drills as you gain confidence and power.
Sample workouts: a practical path to progress
Below is a simple progression you can adapt across 4–6 weeks. Each workout emphasizes a mix of strength and plyometrics to build leg power. Start with 2–3 sets of 6–8 reps on lower-intensity days, then advance to 3–4 sets of 6–8 on higher-intensity sessions as your capacity grows.
Week 1–2: foundational strength and technique
- Resisted squats: 3 sets of 8 reps at 100–150 lbs
- Explosive step-ups: 3 sets of 6 reps per leg using a small plyo box
- Standing resisted hip hinges: 3 sets of 10 reps
Week 3–4: introduce dynamic movements
- Resisted jump squats: 3–4 sets of 5 reps
- Alternating lunges with resistance: 3 sets of 8 reps per leg
- Standing leg curls (hamstrings) with band resistance: 3 sets of 10 reps
Week 5–6: peak power and speed focus
- Band-assisted box jumps: 3–4 sets of 4–6 reps
- Broad jumps with resistance: 3 sets of 5 reps
- Single-leg Romanian deadlifts: 3 sets of 8 reps per leg
Beginners should begin with the basics: light resistance, slower tempo, and a focus on technique. As you become more comfortable, you can increase reps, gradually move to higher resistance, and add more plyometric elements.
Safety and care tips for long-term gains
Always warm up before you train and progress gradually. Inspect bands for nicks or tears before every session, and replace damaged tubing immediately. Proper footwear and a stable surface also help prevent slips during jumps. After workouts, perform a light cooldown and stretch the calves, quads, hamstrings, and hips to maintain mobility and reduce soreness.
Wrapping up: getting the most from your training
Explosive leg power comes from consistent practice, smart progression, and movements that challenge you across the full range of motion. The Green Knight Leg Power Explosion Trainer gives you a flexible, portable way to work on speed and jump height in a compact package. Combined with beginner-friendly progressions and careful attention to form, you’ll build power that translates to faster sprints and higher jumps.